A Little Background
Bad coffee literally makes me a little sad. But a great cup of coffee? I’ll just about pop out a tear of joy if it’s that good.
I remember a handful of epic coffee moments in my life—where time stopped just for a second and I wanted to keep those flavors in my mouth forever and ever, amen. That happened with Kopi Luwak espresso (AKA “Weasel Poop Coffee”) in Bratislava, Slovakia, by the way.
Happiness contributes to our health, and finding inexpensive ways to brighten up your days is worth the effort.
That’s why I wrote this—so you can have one more little thing to bright up your day—a perfect up of coffee.
I used to think Starbucks was the best drip coffee you could buy.
But I got tired of spending the money on these daily Starbucks runs and got tired of waiting in line every morning and getting to work late. And plus, it wasn’t even that good.
I used to think home-brewed coffee every morning was for people who were too cheap to go to a real coffee shop. I eventually got off my high horse and started making coffee at home, but it just wasn’t cutting it, and I just couldn’t “make it as good as Starbucks could”.
Something about my home brewed coffee tasted a bit off, and I couldn’t figure out why, even after using Starbucks beans.
I got tired of smelling a bag of coffee beans and NOT tasting that in my cup. So I set out to make a cup of coffee that tasted like the beans smelled.
After months of tweaking, my daily morning coffee tastes 10x better than a Starbucks cup of brewed coffee. I know that no matter what happens in my stressful drive to work, and no matter what foul mood I’m in at the crack of dawn, that cup coffee is so predictably delicious and I can count on it.
Hey, it’s the little things in life.
Here are 10 factors in making the perfect cup of coffee.
1) Use Filtered Water
This is absolutely the most important thing you should do. Crappy, unfiltered tap water will ruin your coffee because the chlorine and junk in the water that is used to kill bacteria actually reacts with the coffee to produce a dull, strange, taste. Use a faucet filter or a pitcher filter, or even use bottled water if you really want to.
Side note here: We have a faucet filter and we put the water from the faucet into a pitcher in the fridge. But I found that when the water sat for a few days in the fridge, it developed a strange taste. So, I now take it straight from the faucet filter on the cold setting.
If you take no other piece of advice from this page, take my advice here.
2) Use Cold Water
When you use hot water to make coffee, you’re pulling in the water that has been sitting in your hot water tank. It’s not as fresh as cold water, and remember, we want FRESH, cold water.
Your hot water heater also may minerals in the tank that will negatively affect the taste of your coffee.
If you’re using bottled water, your bottles should never, ever get hot. The plastic in those bottles actually disintegrate into the water when it gets very hot and your coffee will have a terrible flavor. So try to even use cold bottled water.
3) Use Whole Beans
This is your second most important piece of advice you should take. Seriously. I know you think you’re saving time by getting a big bag of stale, pre-ground coffee, but have you ever noticed that by the time you get to the bottom of the bag, your coffee starts to taste worse and worse?
It’s because once it’s ground, it starts to lose flavor. Some people say it’s good for about 9 days, but some think only 20 minutes. The surrounding air will start to be absorbed by the grounds and will affect the flavor. Whole beans last longer and taste fresher.
4) Buy Great Beans
Look, if your beans suck, your cup of coffee is going to suck too. Do a little research and find some great beans from your local coffee shop or roaster. You can do what I used to do and just buy whole beans at Starbucks, but who wants to support a multi-billion dollar business forever? I don’t. I’d rather support local roasters.
For example, I buy Tiny Footprint Organic Light Roast: 3 lbs. for $35!
Do you know how long the beans in your grocery store have been sitting there, or in some warehouse? Months and months! Gross!
5) Store the Beans Properly
Stop putting whole beans in your freezer, especially if you’re using dark roast. Do you know what that does? The oils on the outside of the beans congeal in the freezer and turn white. This totally changes the essence of the beans and can really alter the flavor. The beans can also absorb moisture which can stale them faster.
However, if it is a light roast, if it is factory sealed, and you know you’re not going to use them in the near future, freezing them should be okay.
But really, you should be buying your coffee in fairly small amounts for optimal freshness, so you shouldn’t need to freeze them.
Simply store them in an air-tight container in a dark, cool place, like a pantry. If it can’t be dark or especially cool, that’s okay. Just try to keep them airtight at least.
6) Use a Good Coffee Grinder
Cheap metal grinders cut the beans up with metal blades. This will leave the grinds totally uneven—some of them will be course, while some will be fine. This will mess up the consistency of the flavor. The heat conducted by the metal blades can also give your coffee a burnt taste.
I recommend using a Burr Grinder. You can get a cheap Burr Grinder for about $50 and it’s worth every penny. These grinders actually crush the beans, leaving you with a more consistent product. Each of the grounds are about the same size because once it’s ground to the size you designate, it shoots down to a bottom compartment. You have control over the size of your grounds—so if you want it very coarse for a French press or medium grinds for drop coffee makers.
I also love that I can pour almost a whole pound of beans on top, press a button, walk away it shoots out exactly what I need.
Another great suggestion I got from a coffee connoisseur is to try a hand grinder. Some say that you can get a much more consistent, high quality grind with these. However, I used one yesterday and it took me like 5 minutes to get enough for a cup and, well, ain’t nobody got time for that.
If you don’t want to spend $50 or more on a good grinder, and if you don’t want to use a hand grinder, don’t let this stop you from using whole beans. Get a cheap blade grinder if you need to—whatever it takes to get you using whole beans!
Update April 2017: About 90% of my stuff is in storage after moving to Tennessee so I’m sharing a kitchen with so many people that I didn’t have room for my burr grinder. I’ve been using a $10 blade grinder from Walmart for over 2 years now and honest to John, it tastes just fine.
7) Find the Right Method
Drip coffee maker? French press? Percolator? Pour-over? Aeropress? Pod-style makers? Moka pot? Each of these have their upsides and downsides, and it really comes down to preference. I know a lot of people who love French press coffee (and usually these people turn their noses up at people like me who prefer drip coffee makers), but I just don’t like the flavor and the mess.
I really don’t mind drip coffee makers because they’re cheap, they’re predictable, they’re easy to use first thing in the morning, and can be used from 1-12 cups. You don’t necessarily need a fancy coffee maker either. Mine is a mini 5 cup pot and it’s absolutely wonderful.
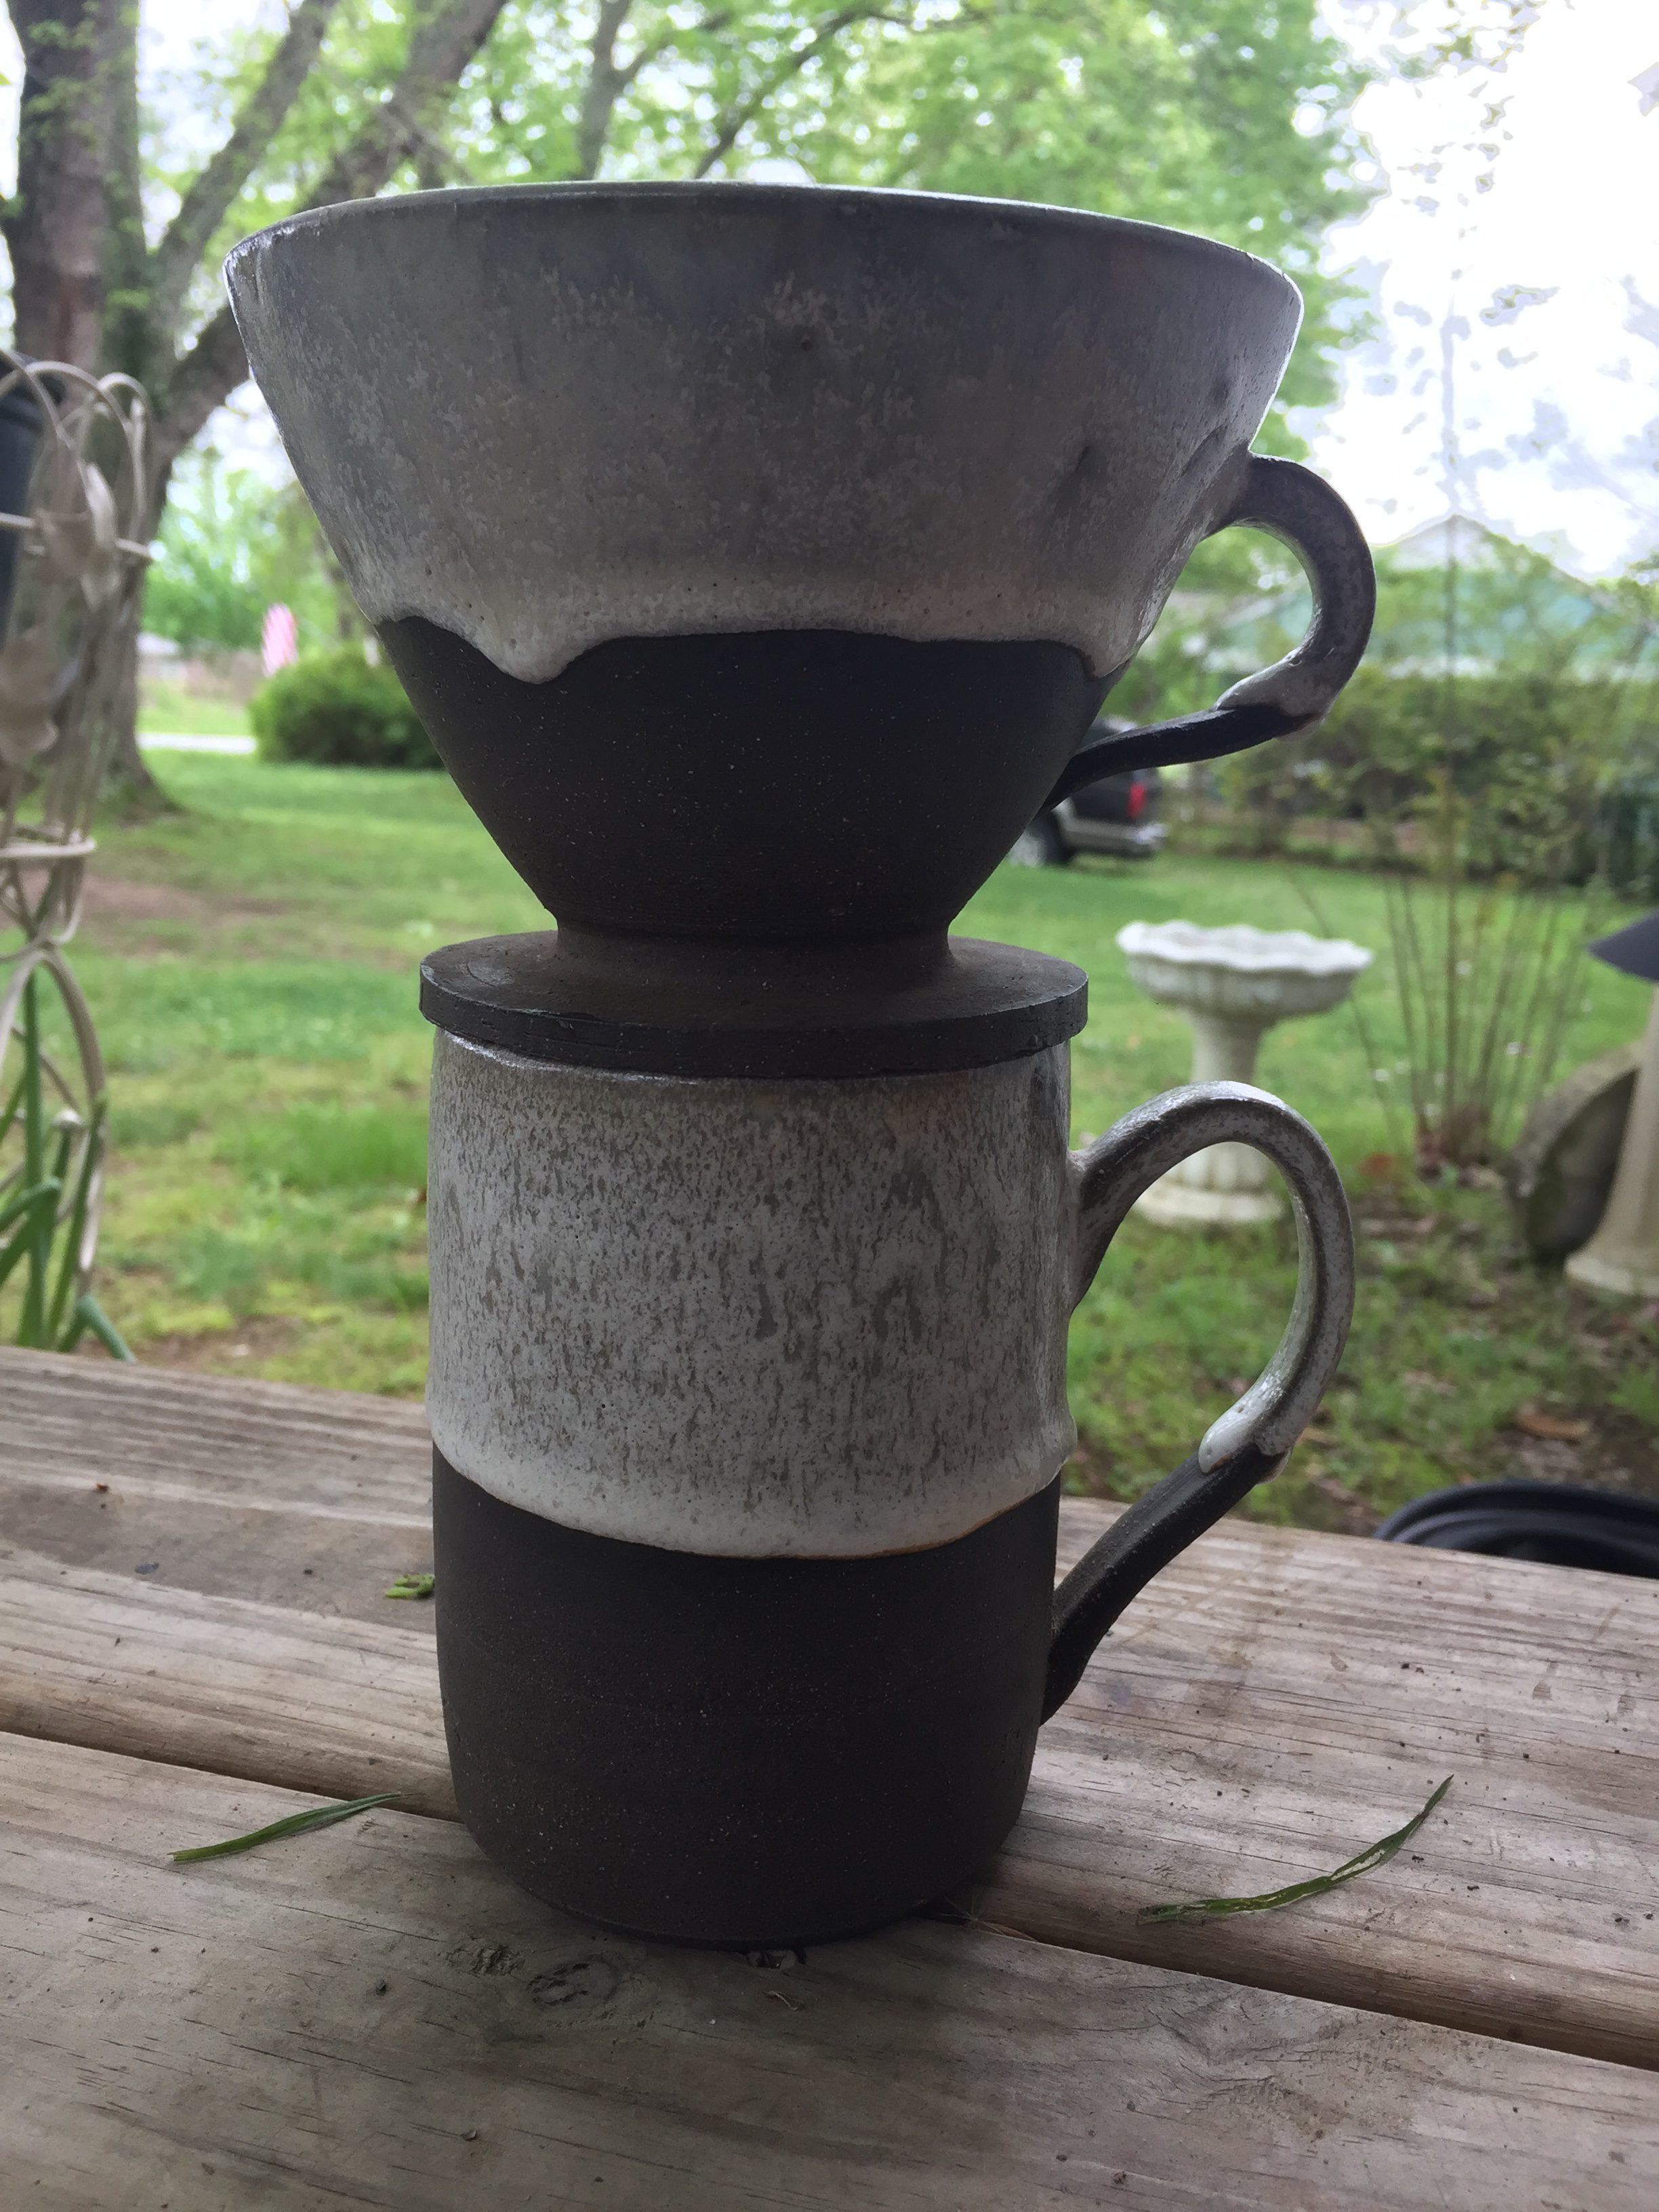
For the past few years I’ve used a ceramic pour over that I made. Pretty, isn’t it?
8 ) Use a Clean Coffee Maker
If you’re using a drip coffee maker, and if you use it every day, you should be cleaning it every few weeks. But a simply clean doesn’t have to be a big deal. Fill it to the top with water and add a teaspoon or 2 of white vinegar. Then, make another pot with just regular water. That’s it! It’s easy to do, and will help take the crap out of the crevasses of your coffee maker innards which could make your end result taste funny.
9) Find the Perfect Grind Size
This will take a little experimentation and it won’t make or break your coffee unless you totally screw it up. If you’re using a drip coffee maker, start on a medium grind and experiment from there.
If you go too fine, your coffee may taste bitter, and if you go too coarse, your coffee will be weak. Find the perfect middle ground that works for you.
French Press requires a course grind or you’ll be left with sludge at the bottom of your cup. Pour overs can handle a much finer grind, which I prefer.
10) Grind Right Before You Brew
Don’t grind enough beans for the week, or even the next day. Grind right before you brew. Only grind what you need for the pot you’re making. You want to be as fresh as humanly possible.
11) Experiment with Roasts
I used to hate light roast coffee because I equated light roast with weak. I equated extra dark roast to strong. That couldn’t be further from the truth! A friend got me a bag of medium roast coffee once and I started using it just so I could say I used it.
With the first sip I realized that light roast coffees are misunderstood. I knew immediately that I had been judging lighter roasts all along and now, that’s almost all I drink. Why? Because light roast coffees taste like the smell of coffee.
Do you know what I mean? You walk into a coffee shop or open a fresh bag of beans and you smell that amazing aroma. Well, THAT is what light roasts taste like in my opinion.
The trick? You’ve got to make it strong enough. My coffee of choice is very strong, light roast.
12) Water to Coffee Ratio
You can get every other piece of this puzzle right, but if your ratio is off, your coffee is going to be way too strong or way too weak. This is all about personal preference, but a good place to start for a drip coffee maker is 1 tablespoons for 6 oz. of water, which is usually about 1 “cup” in your coffee maker. I personally think this is way too weak. I go for about 2 tablespoons per cup, but again, you’ll need to experiment.
For my pour over, I put 1/4 cup of beans into my grinder for 16 oz. of water.
Some coffee connoisseurs may disagree with this, but if I’m making a pot of coffee for several people–1/2 of which like it strong, while the other half likes it fairly weak–I’ll make it quite strong, pour the strong cups, then add hot water to tone the strength down.
But once you find a ratio that works for you, be consistent. Use a tablespoon or a scale if you have to. Try not to eyeball it unless you’re using a burr grinder that is set on the same settings every day. Even then—until you know exactly how much you like, I would use a tablespoon or even a scale. We used a scale at the restaurant I worked for.
13) Let it Sit?
This may be weird for you, but I start making my coffee while I’m getting ready for work in the morning. It ends up sitting in the pot for about 30 minutes before I put cream and sweetener in it. Once I put that stuff in it, I let it sit for another 30 minutes while I’m driving to work. (I don’t want to drink coffee while I’m stressed out driving, and I don’t want to spill hot crap all over me either, so I just wait till I’m at my desk, relaxed).
I personally like the flavor of the coffee when it rests for a while on the burner.Coffee purists would say this is disgraceful, especially if it’s sitting on a heated surface. It’s all about preference though.
I also don’t like to drink really hot coffee, so temperature-wise, I like it after it sits a while.
But some people love it hot and don’t even let the last few drips to come down before they steal a cup. Do whatever your heart desires, but experiment and see what works.
14) Find the Right Cup
I use the same travel coffee mug every morning. It’s perfect. It’s large but not too fat to sit in the cup holder, it’s metal and sleek, it doesn’t have too many grooves on the inside lid so coffee can find its way in the crevasses to mold up, and it absolutely doesn’t leak. However, if insulation is your #1 priority, this may not be the mug for you. But I don’t like super hot coffee so it doesn’t bother me.
I used to use cheap plastic travel mugs, and one morning after I had been looking forward to my coffee for about an hour, I sipped it and it tasted just like liquid plastic. All that work for nothing! I think I threw the mug away that morning.
They say the best type of material to use for a mug is ceramic, as it doesn’t transfer any flavors to your coffee whatsoever. But I’ve also heard that ceramic doesn’t hold the heat very well and it’s also fragile. I tend to break things, so I went with metal, and I haven’t tasted metal once from this thing.
15) Find the Right Creamer
If you don’t use creamer, skip this one. This is a really important part of making my coffee great…and this is probably why you’re going to judge me right now. That’s okay, I’m ashamed of myself too.
I use the fake non-dairy regular creamer. I feel bad about it—I really do. But let me tell you why. I’ve lost track of the times when I went through all the trouble to make a nice cup of coffee, and realize when I sit down at work to take my first sip, that the creamer has gone bad even though there were no chunks in the cream.
I love straight up whole fat cream just as much as the next girl, but this can’t happen. One tiny little factor is not allowed to ruin my coffee. If you don’t have this issue of your creamer going bad, then definitely try to use organic half & half.
If you really want to taste the coffee for what it is, please don’t use that ultra-flavored crap. If you’re going to do that, then don’t take any of my advice above and use the overpowering flavors of the creamer because it’ll cover up any good coffee flavor you were working towards. On the other hand, if that’s what floats your boat, go for it!
Update April 2017: For over two years now I’ve had Bulletproof Coffee almost every single morning. I use 1 T. butter, 1 T. MCT Oil, and 1 T. of local clover honey. Then I blend it with 16 oz. of coffee brewed via pour over. It’s the most amazing thing you’ll ever drink. Look it up if you’re interested! Don’t let the butter throw you off.
Just DON’T TRY IT WITHOUT BLENDING IT. I’m serious, oil slicks on top of your coffee is nasty. Blending it makes a thick, rich, creamy texture that’ll have you pepped and ready to go in no time in the mornings!
16) Find the Right Sweetener
I’ll be completely honest…when my roommate told me she used honey in her coffee, I had the same reaction as my Hummer-owning cousin when he sees Prius commercials… “Damn hippies.” But honestly, I don’t think I’ll ever go back to sugar again.
Local or raw honey is not only really great for you, but it adds another layer of mild flavor and richness to your coffee. The first time you use it, especially if you’re skeptical, maybe try using ½ honey, ½ sugar, as you might taste the honey flavor. I don’t really taste it any more, personally, and now when I have plain white sugar in coffee, I feel like it tastes a little flat and boring.
So experiment! Try brown sugar, honey, raw honey, blue agave nectar, Splenda, Stevia, white sugar, whatever you want. I like using honey too because I don’t have an ounce of guilt about consuming it every day.
What’s yours?
Oh, and a special thanks to Espresso Works for sending along this wonderful infographic about the Surprising Health Benefits of Coffee!



Much obliged! I’m going to make icy blended frosted espresso as well, so that will ideally give a decent alternative in expansive amount! I once saw the tip that you could blend that cool concentrate with high temp water as an other option to the huge percolator… Not certain how functional that would be. We’ll put forth a valiant effort.
I do believe all the ideas you have introduced on your post.
They are very convincing and will certainly work. Nonetheless,
the posts are too short for starters. Could you please lengthen them a little from next
time? Thanks for the post.
Aw, this was a very nice post. Taking a few minutes and actual effort to make a really good article… but what can I say… I hesitate a lot and don’t manage to get anything done.
Thanks! I’m going to make cold brewed iced coffee too, so that will hopefully provide a good option in large quantity! I once saw the tip that you could mix that cold concentrate with hot water as an alternative to the big percolator… Not sure how practical that would be. We’ll do our best. 🙂
Do you have any suggestions for coffee for a crowd? Like 50 servings? 🙂
Hey Sarah! I used to make coffee by the gallon in a commercial kitchen I worked for years back. One thing that may make your life a little easier is to find a kitchen scale and dump your fresh grounds in by weight. All of the other tips are still applicable here as well.
Grinding the beans right before you make the coffee is the most important.
Never, ever let your coffee sit on a warming plate. My coffee pot has an insulated carafe. To keep the coffee hot you must pre-warm the pot with hot water before you brew. I use the hot water to rinse out the sink in the mornings.
If you use a drip coffee maker you should use one with a cone filter instead of a flat filter.
By beans from a local roaster if you can afford it and buy whatever was most recently roasted. I love light roasts and hate dark roasts. Both of these contribute to the reasons why I do not like Starbucks.
Did you know you can roast your own coffee? Buy some green beans and give it a try. Google for instructions.
I’ve heard about this warming plate issue. Can you be more specific as to why one shouldn’t put the coffee pot on a warming plate?
And as far as the filter shape–mine is a cone shape, but I know a lot of people who don’t use the cone shape. Why should one use a cone shape instead?
And yes, I do know about roasting my own coffee and I’ve done it before. For me, at this point, it’s not worth my time and effort since I have no idea what I’m doing, and I can get a great bag of freshly roasted bulk coffee from experienced businesses for pretty cheap.
The warming plate keeps cooking your coffee. If you only make enough to drink quickly it probably doesn’t make any difference. But, have you ever had coffee that has been on the warming plate for too long? It tastes burnt and bitter.
The cone shape has to do with concentrating the flavor, all of the grounds are evenly saturated. Honestly, I am not sure I could tell much difference, it is just something I read many years ago and have stuck with because it makes logical sense.
I had a french coffee press once and did not like it because I hated the clean up.
I had a Milita drip cone and carafe for many years and only broke down and got an electric coffee pot when I could not replace the carafe.
I have been grinding my own beans for years and years and years (I would say decades but that makes me sound old.) I read about roasting your own beans and decided that was more than I wanted to do also, besides I am happy with my coffee.
You have a lot of great tips. But I have a few things to add. First off, letting your coffee sit raises acidity. Though you may prefer this, some people who worry about heartburn and the like might not want to follow this tip. Also, using your metal cup will change the acidity as well. It reacts with your coffee and causes it to oxidize. And incase you didn’t know, not only do light beans mean a more coffee-like flavor, they also have more caffeine! The longer a coffee roasts, the more the caffeine breaks down, and the darker the color becomes.
Thanks for the comment, Shay!
I need to update this post because I don’t let is sit any more. You’re right, it does taste different. I used to not mind it, but now I do.
I’m looking for a leak-proof ceramic travel mug. I’ve loved my metal one because it absolutely doesn’t leak. Ceramic is best, right?
I’m aware that light roasts have more caffeine. That doesn’t negatively affect flavors though.